Ads campaign on Facebook
A huge audience of 1.49 billion monthly active users, flexible, easy to use advertising options and affordable pricing make Facebook an important channel for small and medium-sized businesses to market and advertise their products and services. In this article, you will learn how to launch your first Facebook Ad campaign.
Before starting an ad campaign, you need to connect your store to Facebook and implement the Facebook pixel for optimizing your ad campaigns and monitor their results.
Step 1: Verify your domain
According to new Facebook rules that were implemented after Apple iOS 14 privacy policy updates, you need to verify your domain to create conversion events that can be prioritized for campaign optimization. For example, you need to verify your domain to create retargeting campaigns.
You can skip this step and optimize your ads for non-prioritized events, but in that case, your ads won’t deliver to and report on people who have opted-out of tracking on their Facebook or Instagram apps on an iOS 14.5 or later device.
Domain verification on Facebook simply means that you claim your ownership of your store’s domain. If you use Instant Site, you can verify your store for Facebook, but you won’t be able to create Facebook ads conversion campaigns. Still, you can create other types of Facebook ad formats. To create conversion-focused events for your Facebook ads, you should first connect your own domain to your Instant site, and then verify it.
To verify domain on Facebook:
- From your Facebook Business Manager, go to Business Settings → Brand Safety → Domains.
- Click Add New Domains.
- Type the address of your site and click Add Domain. The domain will be added to your assets.
- Click on the domain you want to verify and choose one of the three domain verification methods:
- Add a meta tag to your domain’s home page (recommended)
- Upload an HTML file to your web directory and confirm ownership of your domain in Business Manager
- Add a DNS TXT entry to your DNS record to confirm ownership of your domain
- Follow the Facebook wizard to complete the verification.
(for Instant Site users) To add meta tag to your home page from your Store admin, go to Website → SEO. In the Header meta tags and site verification block, click Add code and paste the code you copied from Facebook.
Step 2: Create a campaign
When you decide to run an ad, you’ll always start with what you want it to achieve. The campaign level is where you set your main advertising objective.
While Facebook offers a great variety of ads for different business goals, in this article we will focus on setting up an ad campaign aimed at driving sales for your products or services.
If you haven’t added your products to Facebook yet, follow the guide Selling on Facebook and upload your products to Facebook for further promotion.
To launch a new ad campaign for promoting your products:
- In your Facebook Ads manager, click Create Ad.
- Select Catalog sales as your campaign objective.
- Select the product catalog that you are going to promote and click Continue.
If you create a Facebook ad campaign for the first time, you will be asked to open an Ad account and specify your country, currency and time zone:
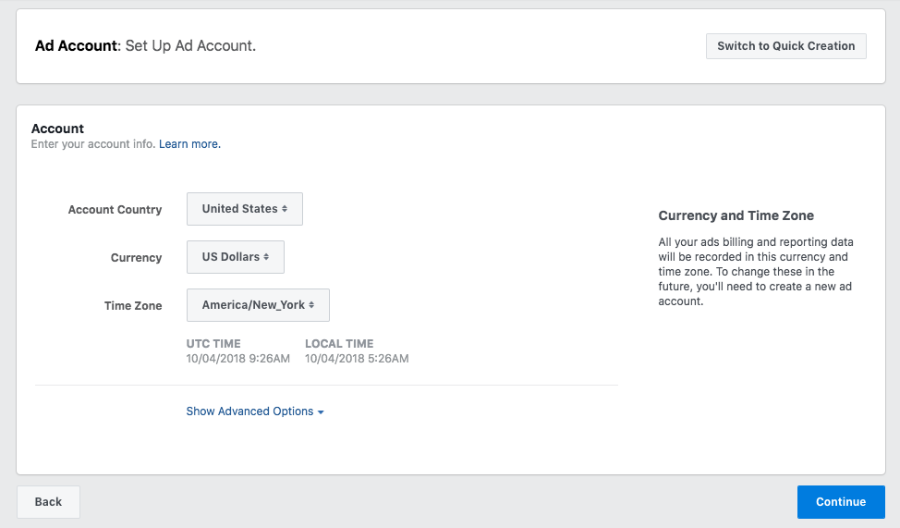
Read more details about Ad Accounts on Facebook.
After choosing your campaign objective and selecting your product catalog, you proceed to creating your ad set where you build your target audience, schedule your ads and set your budget.
Step 3: Create an ad set
At the ad set level, you define how you want your ads to run and what people will see them.
With the help of Facebook’s targeting options, you can build an audience filtered by location, gender, age and more. You also create a budget and set a schedule for your ads and choose their placements.
We understand that retargeting can be really complicated. Check out Facebook & Google Retargeting app for store that allows to launch a retargeting campaign in just a few minutes.
One Facebook Ad campaign can include multiple ad sets, each with different targeting, scheduling and budgeting options selected.
To configure an ad set:
- Enter a name for your ad set:

- Choose the products you want to promote from the Product Set drop-down list:

If your products are grouped into categories, Facebook will automatically create a product set (or collection) for each category.
To better control what products appear in your ads, you can create custom sets of products filtered by price, brand, gender or condition. Click  icon to configure a set of products matching your own criteria.
- Enable the Offer option, if you want to create a discount that your customers can save and get reminders about.
Read more about Offer Ads on Facebook.
- Click Associate your Pixel with your Catalog if you haven’t connected them yet:

- Identify your target audience by selecting one of the following options:
- Use info from your pixel or app to create a retargeting audience, if you want to display your ads to the people who already visited your store, left products in cart or purchased similar items – a classic retargeting strategy;
- Define a broad audience and let Facebook optimize who sees your products, if you want to allow Facebook find people in different locations, of certain age or gender, with particular interests that are most likely to make a purchase in your store – a broad audience targeting strategy.
Read more about creating target audiences for your ads on Facebook.
- Choose where you want to show your ads (ad placements) by selecting one of the following:
- Automatic Placements (recommended), if you want to let Facebook choose multiple placements based on where they’re likely to perform best;
- Edit Placements, if you want to choose your ad placements manually.
Read more about Ad Placements on Facebook.
- Configure your budget and schedule and click Continue:

Read more about Budgets and Scheduling on Facebook.
Now that you have set up your campaign’s objective, target audience, budget and schedule, you will proceed to designing your ads.
Step 4: Create an ad
At this level you will be working on the look and content of your ads:
- Enter a name for your ad that you will see in Facebook reports and notifications:

- Choose your Identity – a Facebook page or an Instagram account (if connected with your Facebook profile) that will represent your business in the ad:

- Select how your ad will look in the Format block:

The Carousel format will work great for multiple products in one ad. The Collection is ideal for displaying your products in an ad that expands into an instant catalog page.
- Choose if you want to display individual items or their categories:

By choosing to display item categories, you can show people different types of items you sell in a single ad unit. This is useful if you want to reach people who are getting to know what you sell.
- Enter a brief text that clearly explains what you are promoting:

- Design the look of your catalog cards:

- Enter a link to your store to the field See more:

- Choose your Call to Action button:

- Click Review to double-check your campaign details.
- Click Confirm send your campaign to Facebook for review.
You may be asked to provide a payment method for your ad account, if you haven’t added one yet. When the billing is sorted out, Facebook will review your ads and they will be live. Congratulations on setting up your first Facebook Ads campaign!