Advanced customization of email templates
You can send customer order notifications, marketing emails, or admin notifications. Email templates are a mix of the HTML and Freemarker code. Each template has message keys, variables and markup that are responsible for different parts of the email. You can customize any template by changing its code: add or remove text, add image, change text size or color, etc.
If you want to add a logo to emails or change company info, it’s enough to change settings in your store admin without editing the code.
Changing the subject of the customer notifications email
Subject is the title customers see when they receive an email. Changing the subject of an email will help you to personalize your notifications.
To change the subject of the email:
- From your store admin, go to Settings → Notifications.
- In the Customer order notifications section, open the email template you want to edit.
- In the Subject field, remove the code and enter your text that will be displayed in the email. In our example, the new title is “Here’s your new order”:

That’s it. Now the email subject will be the one you specified:

Changing customer greetings in emails
By default, all customer emails start with the “Hello John Darling” greeting, where “John Darling” is an example of a name that is replaced with an actual customer name in each email. The greeting continues with the brief information regarding the email subject. For example, in the Order confirmation email, the second line is “We have received your order! Thank you for your purchase”.
You can change both the greeting itself and the following lines by changing the rosetta.message keys of the email.
Let’s say you want to change the Order confirmation greeting to: “Hey John Darling! Thank you for your trust! We received your order. We will contact you to confirm the delivery time.”
To change the greeting in an email notification:
- From your store admin, go to Settings → Notifications.
- Click Edit next to an email template you want to edit. In our example, it’s the Order Confirmation email template.
- Find line with message key that contains the “Hello” part: <@rosetta.message key=”OrderConfirmation.customer_greeting” params={ “customerName”: customer.name } /> :

- Replace all the text in this line with your message. In our example, it’s Hey ${customer.name},
- Find line that contains the order confirmation part: <@rosetta.message key=”OrderConfirmation.Confirmation.paid_order” params={ “storeName”: store.name?html, “dateCreated”: order.dateCreated } />
- Replace all the text in this line with your message. In our example, it’s Thank you for your trust! We received your order <@orderLink/>. We will contact you to confirm the delivery time.
- Save the changes.
Now your customers will see the customized greetings in their Order confirmation emails:

Adding text to the customer order notifications
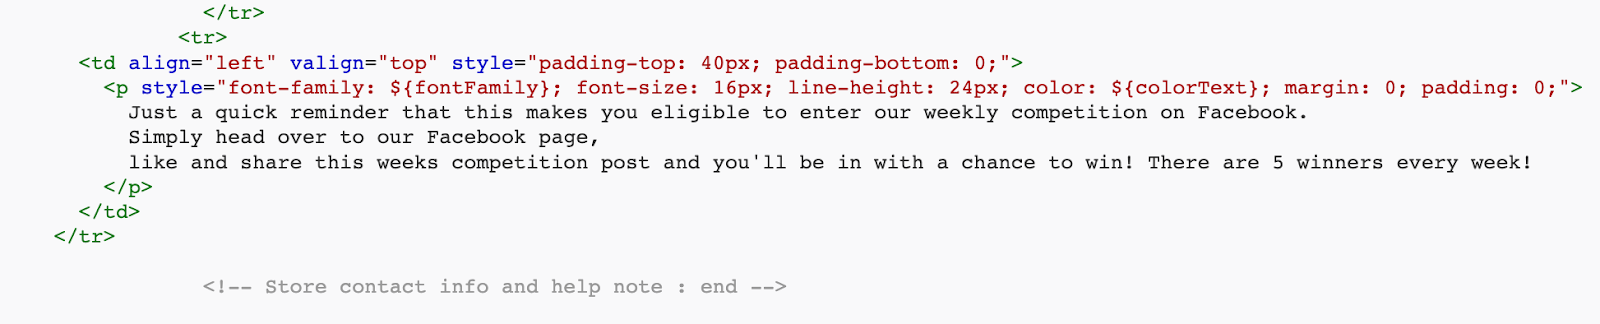
You can add custom text to any email notification. Let’s say you want to inform your customers that you run a contest on Facebook. Adding a short paragraph to the Order confirmation email will put a spotlight on your contest.
A text paragraph can be added to any part of the email. In our example, it will be the “Thank you” section at the end of the email.
Gray markups will help you to navigate through the template.
To add a new content to the email template:
- From your store admin, go to Settings → Notifications.
- Click Edit next to the customer email template you want to update.
- Find the section where you want to add text. In our example, it’s the “Thank you” section that is located between the <!– Store contact info and help note : start –> and <!– Store contact info and help note : start –> markups near the bottom of the template.
- Add the following piece of code just above the <!– Store contact info and help note : start –> line:
<td align="left" valign="top" style="padding-top: 40px; padding-bottom: 0;"> <p style="font-family: ${fontFamily}; font-size: 16px; line-height: 24px; color: ${colorText}; margin: 0; padding: 0;"> ADD YOUR TEXT MESSAGE HERE </p> </td> </tr> - Replace the Add your text message here with your own text. It will look like this:
- Click Save.
Done. Your custom message will appear at the bottom of the email, after the Thank you message. Click Preview template to see the updated email template:

Adding images to email notifications
Images are useful when you want to grab customers’ attention to a specific event, promotion, product, or whatever you want to emphasize. You can add a picture in .jpeg or .img format to any email template.
To add an image to an email template:
- Upload your image to any image hosting. For example, ImgBB, Free Image Host, or else.
- Open the image in your browser and copy the image address. It should end with .png, .jpeg, or .img.
- From your store admin, go to Settings → Notifications.
- Open the email template you want to edit.
- Click Preview template to decide on which part of the email you want your image to appear. In our example, the image goes after the “Thank you for shopping with us” part.
- In the template, find the part of an email where you want to add an image. Use markups and message keys to navigate the code. In our example, the “Thank you part” of the email is located between the <!– Store contact info and help note : start –> and <!– Store contact info and help note : end –> lines of code.
- Add the following piece of code where you want to show the image: <img src=”URL”>, where URL is the link to an image you copied on step 2:

- Click Save.
Done. Now your image will appear in the email template:

Changing color of the text in the email notification
It is possible to brand an email with your business-specific colors. In the email template, the ${colorText} markup defines colors of different text blocks. So all you need to do is set the color markup parameter to the HTML code for any specific color.
Let’s say you want to change the greetings color to green. The HTML code for green is #45B212.
You can find the code for any color on the HTML Color Codes site.
To change the text color in the emails:
- From your store admin, go to Settings → Notifications.
- Click Edit next to the email template you want to update.
- Find the ${colorText} element near the text section you want to update. To speed up the process, press Ctrl + F (Command + F on Mac) to find the markup. The text color markup will be above the message key it relates to. In our example, it’s the greetings part:

- Replace the ${colorText} with the HTML color code. In our example, it’s #45B212 for green color:

- Click Save.
Now the greeting in the email template will be green:

Adding clickable tracking number to a custom rate shipping
You can add a tracking number to an order. Your customers will get an email notification about the shipped order with a clickable tracking number. Once they click the Track your package title from the email, they will be redirected to the carriers’ website.
However, a tracking number is clickable only if you use carrier-calculated rates and ship with UPS, USPS, FedEx, Royal Mail, Australia Post, Canada Post, Brasil Correios, or MDS Collivery. If you ship with flat rates, custom table rates, or use any other shipping service, the tracking number won’t redirect buyers to the carriers’ website. Yet, it’s possible to manually edit the Ship Order email template to make a tracking number clickable so your clients would be redirected to a carriers’ website to track their order.
To add a link to a tracking page on a carrier’s website:
- From your store admin, go to Settings → Notifications.
- In the Customer order notifications section, open the Order Shipped email template.
- Find the piece of code in the template body that starts with the “Order tracking number start” and ends with the “Order tracking number end”. Usually, it’s 73-102 lines of code:

- Replace the above code with the following, where LINK_TO_CARRIERS_WEBSITE is the actual link to the site where a customer can track their order:
<!-- Order tracking number : start --> <#if order.trackingNumber?has_content> <tr> <td align="center" valign="top" style="font-family: Arial,sans-serif;font-size: 14px;line-height: 24px;padding-top: 35px;"> <#if order.shippingMethod.carrierName?has_content> <b><@rosetta.message key="OrderShipped.OrderTracking.number_with_shipping_method" params={ "carrierName": order.shippingMethod.carrierName } /></b> <#else> <b><@rosetta.message key="OrderShipped.OrderTracking.number" /></b> </#if> </td> </tr> <tr> <td align="center" valign="top" style="font-family: Arial,sans-serif;font-size: 24px;line-height: 30px;padding-top: 1px; color: #333333;"> ${order.trackingNumber} </td> </tr> <#if order.trackingUrl?has_content> <tr> <td align="center" valign="top" style="font-family: Arial,sans-serif;font-size: 14px;line-height: 24px;padding-top: 16px;color: #333333;"> <a href="LINK_TO_CARRIERS_WEBSITE" style="text-decoration: none;"><b><@rosetta.message key="OrderShipped.OrderTracking.link_text" /></b></a> </td> </tr> </#if> <tr> <td style="font-size:1px; line-height: 23px;"> </td> </tr> <!-- Order tracking number : end --> - Click Save.
Now your customers will receive an email with a link to your carrier’s website. Once they click a link, they will be redirected to a website that you specified in the email template. On the website, they can specify a tracking number from the Order Shipped email.