Product categories
Categories are groups of products that you wish to show on the same page in your store (for example, Women’s Fashion, Men’s Clothing). They help customers to faster navigate through the store and find the products they need. The same product can belong to multiple categories at the same time. Read more about how to manage the categories in your store.
Creating categories and subcategories
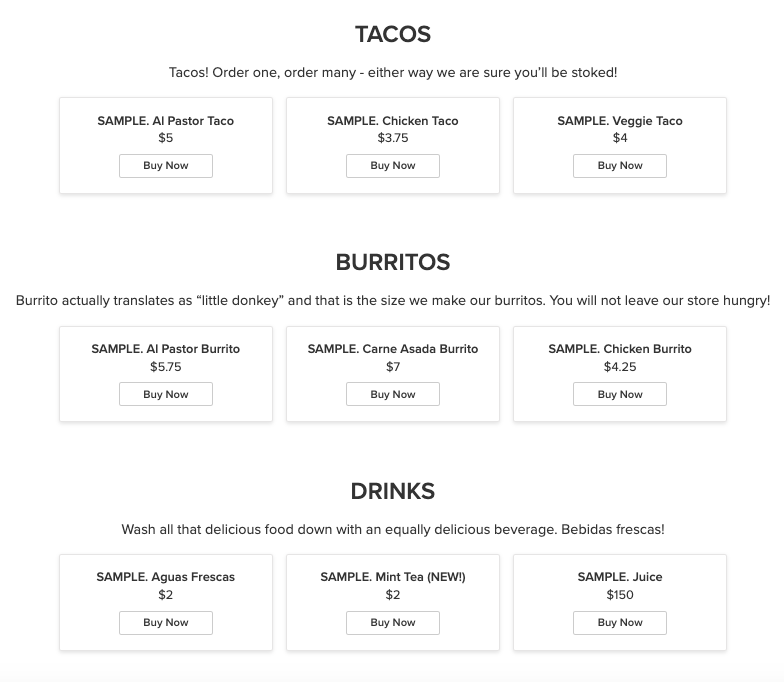
The products from one category are listed on a separate page in the storefront. This page can have a description and a featured image. When adding an image, make sure that it represents the content of the category well.
Use the description to tell your customers what they will find in this category and what are the best things about the products there. Try not to make the description too long.
In your store, you can create a complex category structure with several levels. Categories of the first level are referred to as root categories. These are the categories your customers see in the main navigation. You can also create categories of the second, third, etc. level within your root category. They are referred to as subcategories or child categories.
A clear and concise category structure makes your store’s navigation intuitive. This allows your customers to easily find what they are looking for. That’s why we recommend planning your category structure before adding products.
Customers can navigate your categories and subcategories with the help of breadcrumbs – special links that show the path to the page they are currently viewing.
Here are the steps to create a new category of the first level:
- From your store admin, go to Catalog → Categories.
- Click Add Root Category:

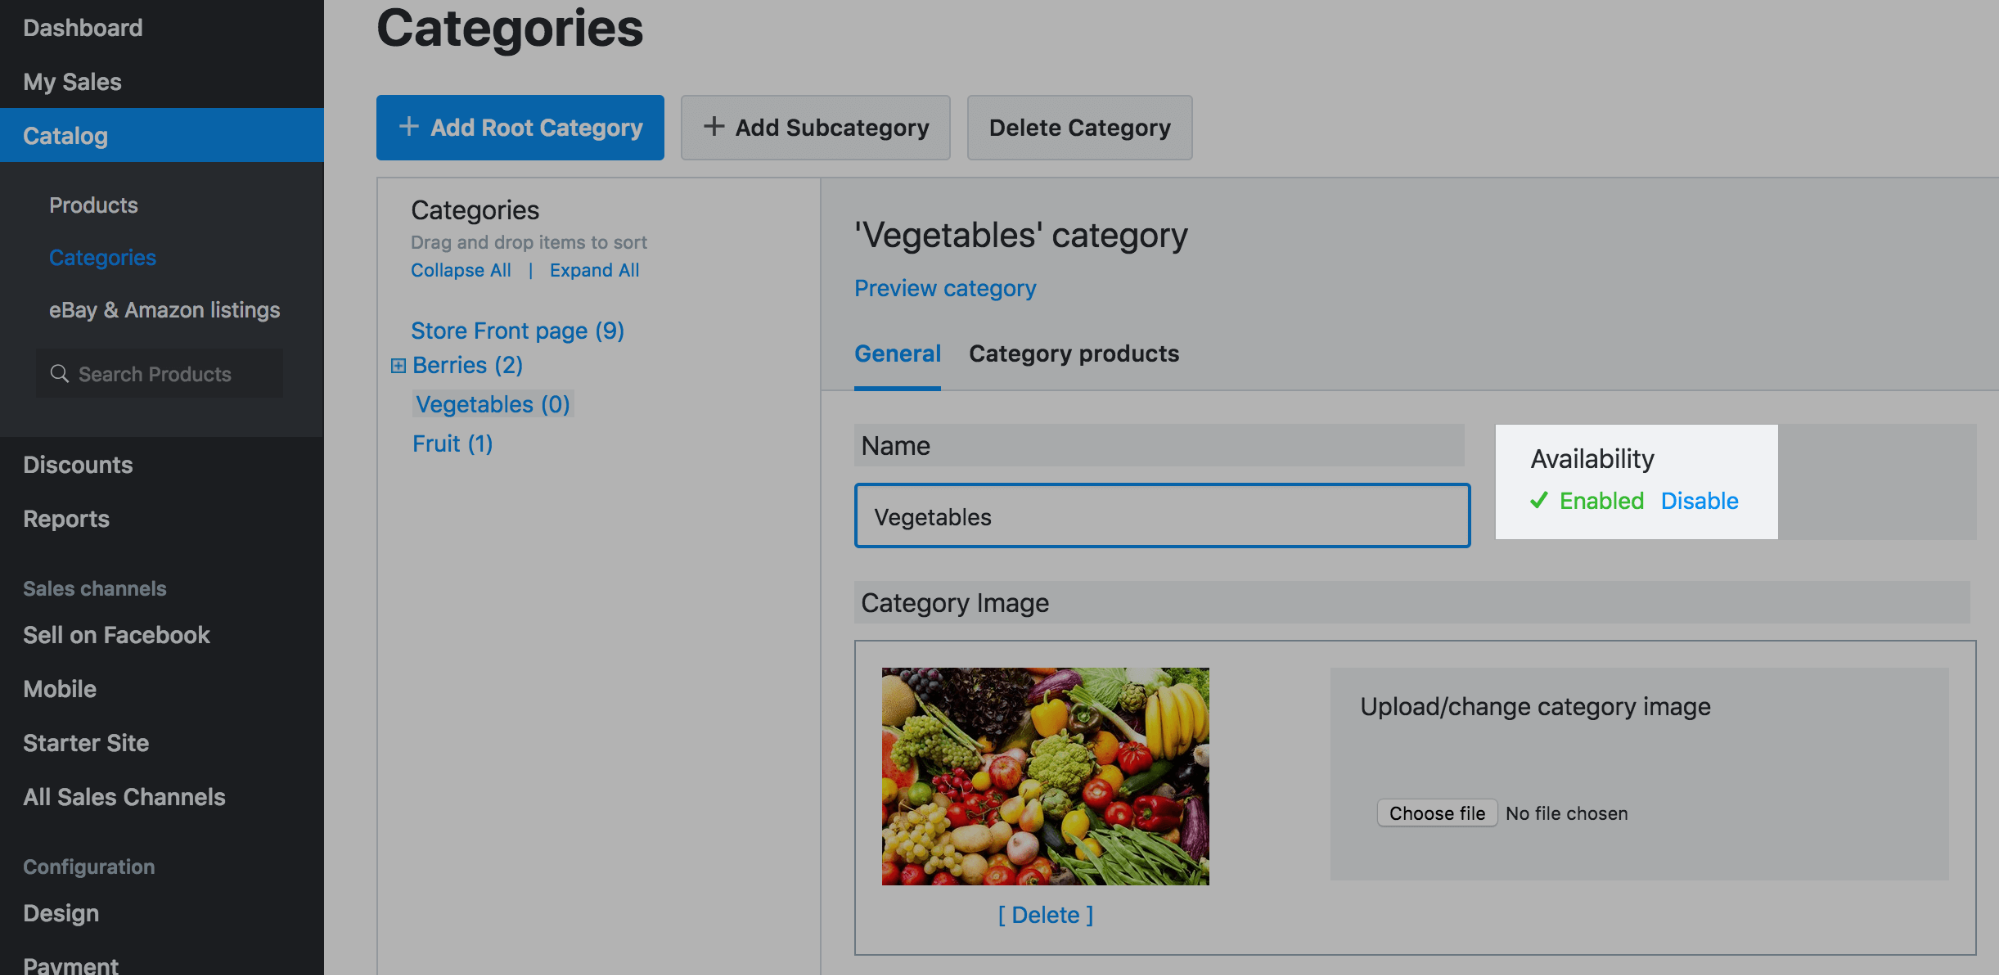
- Enter the Name of your category:

You can edit the name of a category anytime later. To do it, just change the text in the Name field and save changes.
- Click Choose file to upload an image for your category. You can upload an image that represents your category or an image of a product from the category:

- Enter the description. You can describe what kind of products are in that category, or just leave it blank:

- Click Save.
To create a new subcategory:
- From your store admin, go to Catalog → Categories.
- Select the category into which you want to add a subcategory from the category tree on the left.
- Click Add Subcategory:

- Enter the Name of your category:

- Click Choose file to upload an image for your category. You can upload an image that represents your whole category or an image of a product from the category:

- Enter the description. You can describe what products are in that category, or just leave it blank:

- Click Save.
Assigning products to categories
In your store, a product must belong to at least one category. So, when you add products without assigning them to any of your own categories, they are automatically assigned to the Store Front page category and appear as featured products on your storefront.
To show products in your own categories, you should assign them to these categories. You can add products to multiple categories at once. For example, an item that belongs to the Shoes category can be on sale and belong to the Sale items category as well.
To assign a product to a category:
- From your store admin, go to Catalog → Categories.
- Select the category to which you want to assign a product from the category tree on the left.
- Switch to the Category products tab.
- Click Assign Products to Category:

- Select the necessary items in the list. You can filter the products by SKU and Name.
- Click Add products to assign items in bulk (or click the plus icon to assign products one by one):

You can also assign and remove categories in bulk for selected products right on the Catalog → Products page in your store admin. Just tick all the products you want to update, click Mass Update and choose your option.
Besides making such changes on the category level, you can also assign a product to categories (or move a product from one category to another) right in the product’s editing page:
- From your store admin, go to Catalog → Products.
- Open the product in editing mode.
- In the Categories section at the page bottom click Change Categories:

- Select the category to which you want to assign the product and click Ok:

- Click Save.
You can see how many products are assigned to this or that category in the category tree in your store admin in Catalog → Categories:

Note that it may take several minutes for the numbers to update in the category tree after you make changes in your catalog structure.
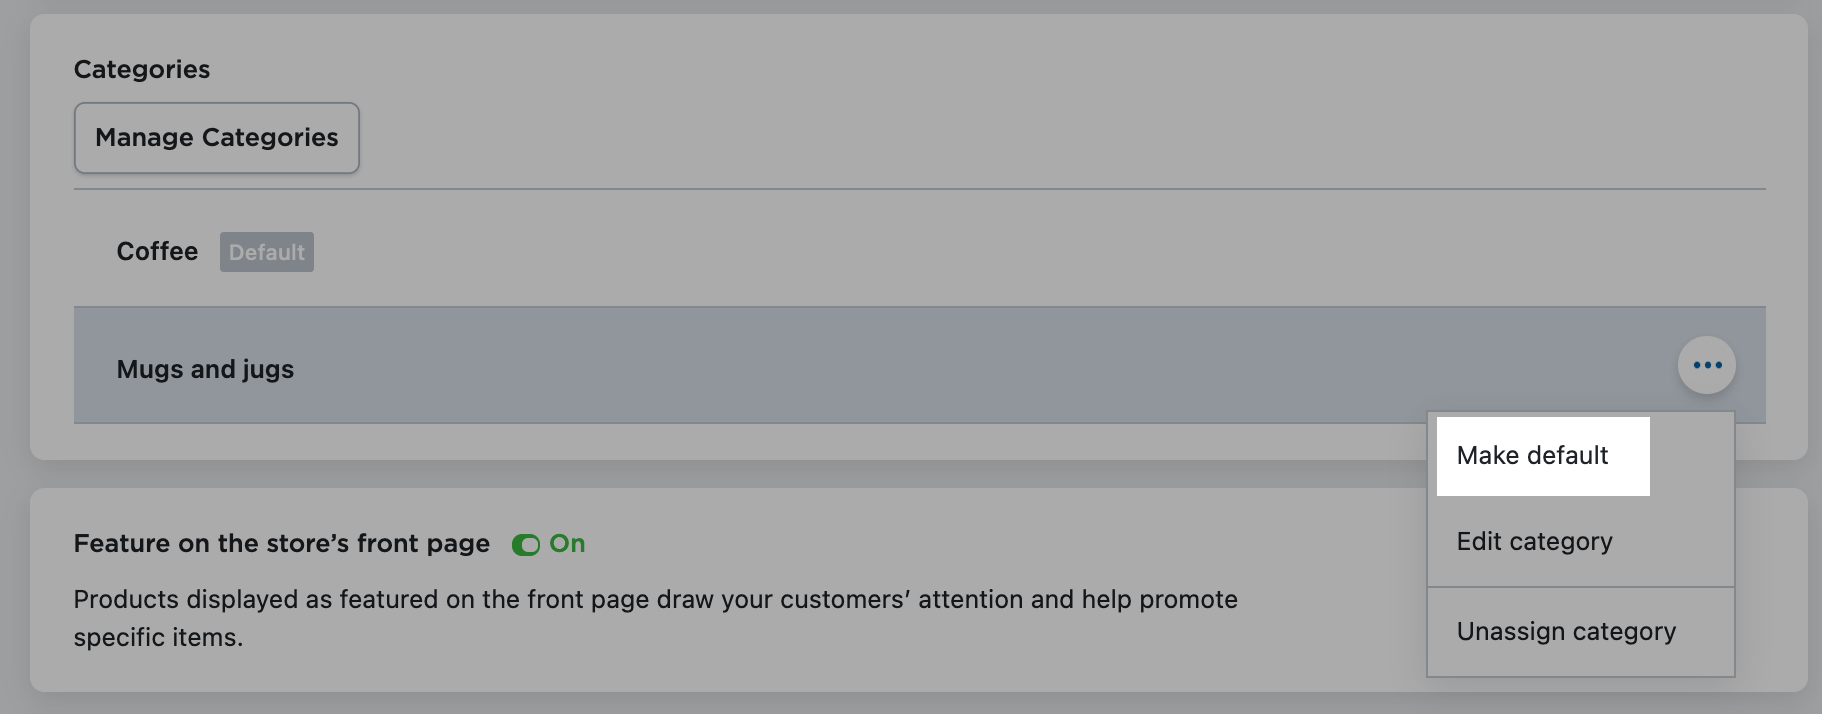
If one product is assigned to two or more categories, one of the categories will be marked as Default. The default category will be shown in the breadcrumbs on your product’s page. For instance, if you assigned a coffee mug to the “Coffee” and “Mugs” categories and selected the “Mugs” category as default, breadcrumbs for the item on the products page will look like this: Home / Store / Mugs.
To change the default category:
- From your store admin, go to Catalog → Products.
- Open the product you want to change the default category to.
- Scroll down to the Categories section.
- Choose the category you want to make default and click the three dots:
- Click Make default and click Save:
Moving products from one category to another
You may need to rearrange products in your store and move them to another category. You can do this by exporting the products and importing them to a new category or by editing the categories manually.
Exporting the products and re-importing them to a new category
To rearrange many products, it’s best to import them with new parameters. You need to export the products you want to change, edit them in a spreadsheet, and then re-upload them to your store using the import feature. Please refer to the articles about exporting and importing your products.
Editing the categories manually
You can manually rearrange categories for several products on the Catalog → Products or on the Catalog → Categories pages in your store admin. The first option allows you to assign and remove categories in bulk.
To rearrange products on the Products page:
- From your store admin, go to Catalog → Products.
- Tick all the products you want to update (you can click Filter in the left upper corner to use filters and make the search faster).
You need to create at least one category in your store (on top of the default Store front page category) before it becomes possible to assign or remove categories.
- Click Mass Update → Manage Categories → Assign or Remove Categories.
- Tick or untick the categories in the list:

- Click Apply.
The changes will be saved automatically. The categories will be assigned to/removed from all the selected products.
If you need to add featured products to the Store front page or remove featured products from the Store front page in bulk, you can also do that on the Catalog → Products page.
To rearrange products on the Categories page:
- From your store admin, go to Catalog → Categories.
- Find the desired category in the left panel and click it.
- Open the Category products tab:

- Click Remove All. They are now uncategorized and will be listed on the storefront page much like featured products.
- Open the category where you want to move the products.
- Open the Category products tab.
- Click Assign Products to Category.
- In the popup, select the products to add.
- Click Add products:

- These products are now listed under the desired category.
Sorting products in categories
You can choose in what order to show the products in the storefront to your customers. Products can be automatically sorted by date added, by price, or by name. Or you can set a custom order of products within a category and arrange the products manually in the desired way.
Changing categories order
If you wish to show some categories first, you can easily change the order of categories and subcategories:
- From your store admin, go to Catalog → Categories.
- Drag and drop categories in the category tree:

Disabling and deleting categories
If you wish to remove a category from your store, you can disable it or delete it permanently.
Disabling a category
When you disable a category, it stops showing in your store. At the same time, you can see it in your store Control Panel and enable it back if needed.
To disable a category:
- From your store admin, go to Catalog → Categories.
- Select the category you want to disable.
- Click Disable:
The enabled products from a disabled category will not show in the storefront navigation, but will still be available by a direct link and in the search results.
Deleting a category
If you wish to remove a category completely, you can delete it:
- From your store admin, go to Catalog → Categories.
- Select the category that you want to remove in the category tree on the left.
- Click Delete category:

The products that were assigned to the deleted category will not be deleted. They will be moved to the Store Front page category.
Hiding category images
When you add a category in your store, you can upload a category image to illustrate what it’s about:

If you create a category without any image, your online store will automatically show a gradient image for such a category in the storefront:

If you want to display categories without images, you can hide all category images across your store (including subcategory images). To do this, navigate to the Design page, scroll to the “Category name position” section, and choose Hide category images. The result will look like this:

Expanding categories
If you have a small catalog or want a menu-like look, you can show all categories with all products on one page:

To expand categories, go to the Design page, scroll to the “Storefront navigation & colors” section, and select the Expand categories option.
You may want to have product lists without images at all (for example, you do not have pictures of your products yet or want to have a more compact view). In this case, in addition to hiding category images, you can also hide product images. For this, go to the Design page, scroll to the “Product Card details and layout“ section and select Do not show for the Main product image setting. Here is an example of how your listings can look in this case: