Configuring design and content for New-gen Instant Site
Instant Site is a free website that you get with your store account. It has a built-in online store so that you can start selling right away.
Instant Site consists of customizable blocks that allow you to easily build an attractive and functional website. You can add new blocks from the library, remove/hide the blocks that don’t work for you, and arrange the sections in the desired order. You can also easily change the content and design of the blocks to match your needs and reflect your brand. The website of your online store will have responsive design that looks great on desktop, tablet, and mobile.
To edit your Instant Site content and design, go to Overview → Manage Instant Site in your store’s admin and click the Edit Site button.
Introducing the editing mode
When you open your Instant Site for editing (Overview → Manage Instant Site → Edit Site or Website → Edit Site), you can see the list of Site Blocks that your Instant Site currently consists of.
All these blocks are visible on the Instant Site preview to the right, where they appear in the same order they go in the list:

To visit your site on the web and see how it looks on a separate tab, click your Instant Site’s address on top of the Editor.
Adding blocks
If you need extra sections for your website (e.g., a “Special Offer” section, blocks with info on delivery/payment, or an extra “About Us” block) or you want to replace the default block with the one that suits your store better, you can easily add as many new blocks as you like.
To add a block to your Instant Site:
- From your store’s admin, go to Overview → Manage Instant Site → Edit Site (or Website → Edit Site).
- Click Add Block.
- On the opened page, click the preview of the block you need. The blocks are grouped by their topic:

- Once you click on the block, it will be opened for editing and added to your list of Site Blocks.
You can edit block design and content to your liking and change its position on your website. If you have duplicating blocks (e.g., you have added a new Cover block with the layout that appeals to you more), you can always delete the ones that are extra.
Editing blocks
Your website can have the texts, colors, and images that suit your business needs. You can edit the content and design for each of the blocks that are present in the Site Blocks list of the Instant Site Editor.
To edit the content of the block:
- From your store’s admin, go to Overview → Manage Instant Site → Edit Site (or Website → Edit Site).
- Сlick the block.
- On the Content tab, find the element you need.
- Make the necessary changes (change the text, upload a new image, set up action links, etc.)
Pre-entered texts in the block templates contain tips on what to write in the fields.
You can upload images in JPG, PNG, JPEG2000, GIF, WEBP, and TIFF format that are under 20 MB each. The recommended size is 1500-2000px. As the website layout adapts to the screen size of a customer’s device, try to crop your images so that the most important information is in the center. If you want add text to your images, you can add it in the Instant Site Editor (instead of a photo editor).
To avoid clipping, you can add borders – black, white, or transparent – to your images.
To edit the design of the block:
- From your store’s admin, go to Overview → Manage Instant Site → Edit Site (or Website → Edit Site).
- Сlick the block.
- Switch to the Design tab:

- Make the necessary changes (set the block layout – it defines positions of elements in relation to one another, change font/style/color for the elements of this block, set up the background, choose which elements to display, etc.)
You can always go back to the previously saved version of your website by clicking Unpublished Changes → Discard All Changes on top of the Editor. For the changes made on the Design tab of the block, you can also use the Restore block defaults link at the bottom. Please, note that this link brings back the initial settings of the design template for this block.
Blocks with unsaved changes in the Site Blocks list will be marked with a blue dot:

Once you are done editing your website, click the Publish button in the top right corner of the Editor.
Changing the order of blocks
The blocks of your Instant Site are displayed in the order they go in the Site Blocks list of the Instant Site Editor (Overview → Manage Instant Site → Edit Site). You can change the order of sections in the desired way. For this, simply drag and drop your Instant Site sections in the list.
As an option, you can also click Settings → Reorder Blocks to drag and drop your Instant Site sections on a dedicated page:

You can change the order of all the blocks except for Header and Footer – these are always the first and the last blocks of your website.
Deleting blocks
You can delete a section from the Site Blocks list if you don’t need it on your Instant Site. For example, you are just setting up your store and don’t have a customer testimonial to feature yet, or your business is seasonal, and you don’t need the Featured Products block at the moment.
To remove a block from your Instant Site:
- From your store’s admin, go to Overview → Manage Instant Site → Edit Site (or Website → Edit Site).
- Сlick the block.
- Scroll down and click Delete block at the bottom:

If you need this block on your website later, you can always add similar blocks from the library.
You cannot delete the Header and Footer blocks, but it’s possible to disable them so that they are not displayed on the website. To do this, click the corresponding block in the Editor, then scroll down and disable the Show footer or Show header toggles at the bottom. You can always enable them back later.
Customizing header appearance
A website header is the top section of your site. It contains a logo (or your store’s name), a search bar, action links, a bag icon, a navigation menu, and contact information. You can adjust the design of the header to match your brand identity.
To edit the design of the header:
- From your store admin, go to Website and click Edit Site.
- In the Site Blocks section, click Header.
- Click the Design tab to customize appearance:
- Site logo: Change font, size, and color of the store’s name. You can also add more space between letters and capitalize the name.
- Background: You can make the header transparent, grayscale transparent, or choose a solid color for the background. To change the color, select the Solid color in the dropdown and choose the color.
- Menu & icons: Change font and color for all content in the header. Here, you can also specify what elements to show in the header.
- Action links: Customize the call to action button style in the header. You can also disable or enable the button with the Show element toggle.
- Click Publish.
Adding navigation menu
Navigation or website menu is a list of links that is displayed on your site:

You can create a website menu to make it easier for customers to navigate while browsing your store and find what they are looking for. The navigation menu on your Instant Site will be displayed as a horizontal bar of links at the top of your site for desktop users. Mobile customers will see the hamburger menu instead. They have to tap the menu to see the links.
When a customer clicks a link, a certain action is performed. Depending on what you choose, customers can be redirected to the specific block of your site or to any other page on the Internet. You can also create a click-to-call or mail-to link, so that a customer can reach out to you.
To set up a navigation menu:
- From your store’s admin, go to Website and click Edit Site.
- In the Site Blocks section, click Header.
- In the Content tab, click Navigation menu.
- You can click on the existing link to edit it or create a new link by clicking + Add Menu Item.
- In the Name field, enter the name that will make sense to customers. For example, About Us, Give Us a Call, etc.
- Choose the action on click:
- Scroll to site block — a customer will be redirected to one of your site’s blocks.
- Open page — you can enter any URL to redirect customers on that page.
- Compose email — after clicking the link, the default mail service on a customer’s device will open.
- Call phone — after clicking the link, a customer’s phone will dial your number.
- Go to store — a customer will be redirected to your storefront.
- Click Back and then Design.
- In the Layout section, select how you want to display your navigation menu.
- Click Publish.
- (optional) You can change the order of the links. While editing your site, go to the Header → Navigation menu to see the list of all the links you created. You can rearrange the menu items order by dragging them the way you want. Click Publish.
You can also change the design of the navigation bar to match your brand identity.
To edit the design of the website menu:
- From your store’s admin, go to Website and click Edit Site.
- In the Site Blocks section, click Header.
- In the Design tab, click Background to choose the color for the navigation bar.
- Click Navigation menu to choose the font and color for the links in the bar.
- Click Publish.
Adding categories menu
Product categories are groups of items that you bundle to show on the same page in your store — for example, Coffee Mugs, Summer Fashion, Bestsellers. You can display the menu of your root categories, so that shoppers can quickly find the product they are looking for:

To create a categories menu on your Instant Site:
- From your store’s admin, go to Website and click Edit Site.
- In the menu on the left, click Header → Navigation Menu and click + Add Menu.
- Name the item so that it’s clear for customers that it is the link to your store.
- Click the Action on click drop-down and select Go to store.
- Make sure the Show categories on menu hover toggle is enabled. You can turn the toggle off to hide the categories menu.
- Click Save and Publish.
Note that since the categories menu is shown on hover, it won’t display on mobile devices. When a customer taps a store link from the menu, they will be redirected to your store right away.
Adding action links
For some sections of your Instant Site (e.g., site cover, testimonial, or the “Contact Us” block) it is possible to add action links. Action links are clickable texts or buttons with text. When a customer clicks this text (or button), a certain action is performed.
For example, you can specify a product URL that will open upon click or scroll customers to a specific section of your website (e.g., when there is a sale).
To set up an action link:
- From your store’s admin, go to Overview → Manage Instant Site → Edit Site (or Website → Edit Site).
- Сlick the block.
- On the Content tab of the block, click Add Action Link.
Cover block has Primary action and Secondary action buttons instead.
- Enter Title. This will be the text of your link.
- Choose Action on click: Scroll to site block, Open page, Compose email or Call phone.
- Choose the site block/enter URL/enter email or phone number.
- (optional) Change the appearance, font, size, shape, and color of the action link on the Design tab.
Example design of an action link for an email in the “Contact Us” block:

Configuring the store blocks
There are two blocks that can show customers where to access the store on your Instant Site: the Featured Products block and the Root Categories block. By default, only the Featured Products block is present in the Site Blocks list:

The Featured Products block includes all the products that are assigned to the Store front page category in your store. This block is a perfect place to showcase items that you want your customers to see most. Once a customer clicks on a featured product, they will be redirected to the page of this product in your store.
If you have a small catalog, then you can simply have all the products in the Featured Products section. In case you have a larger catalog, though, you will most likely need a system of categories in your store. To display these categories right on the front page of your Instant Site, you can add a special Root Categories block. This block will contain all the root categories that you have.
To make categories easier to navigate, you can also set up a categories menu.
To add a Root Categories block:
- From your store’s admin, go to Overview → Manage Instant Site → Edit Site (or Website → Edit Site).
- Click Add Block.
- On the opened page, scroll down to Products.
- Click the Shop by category block:
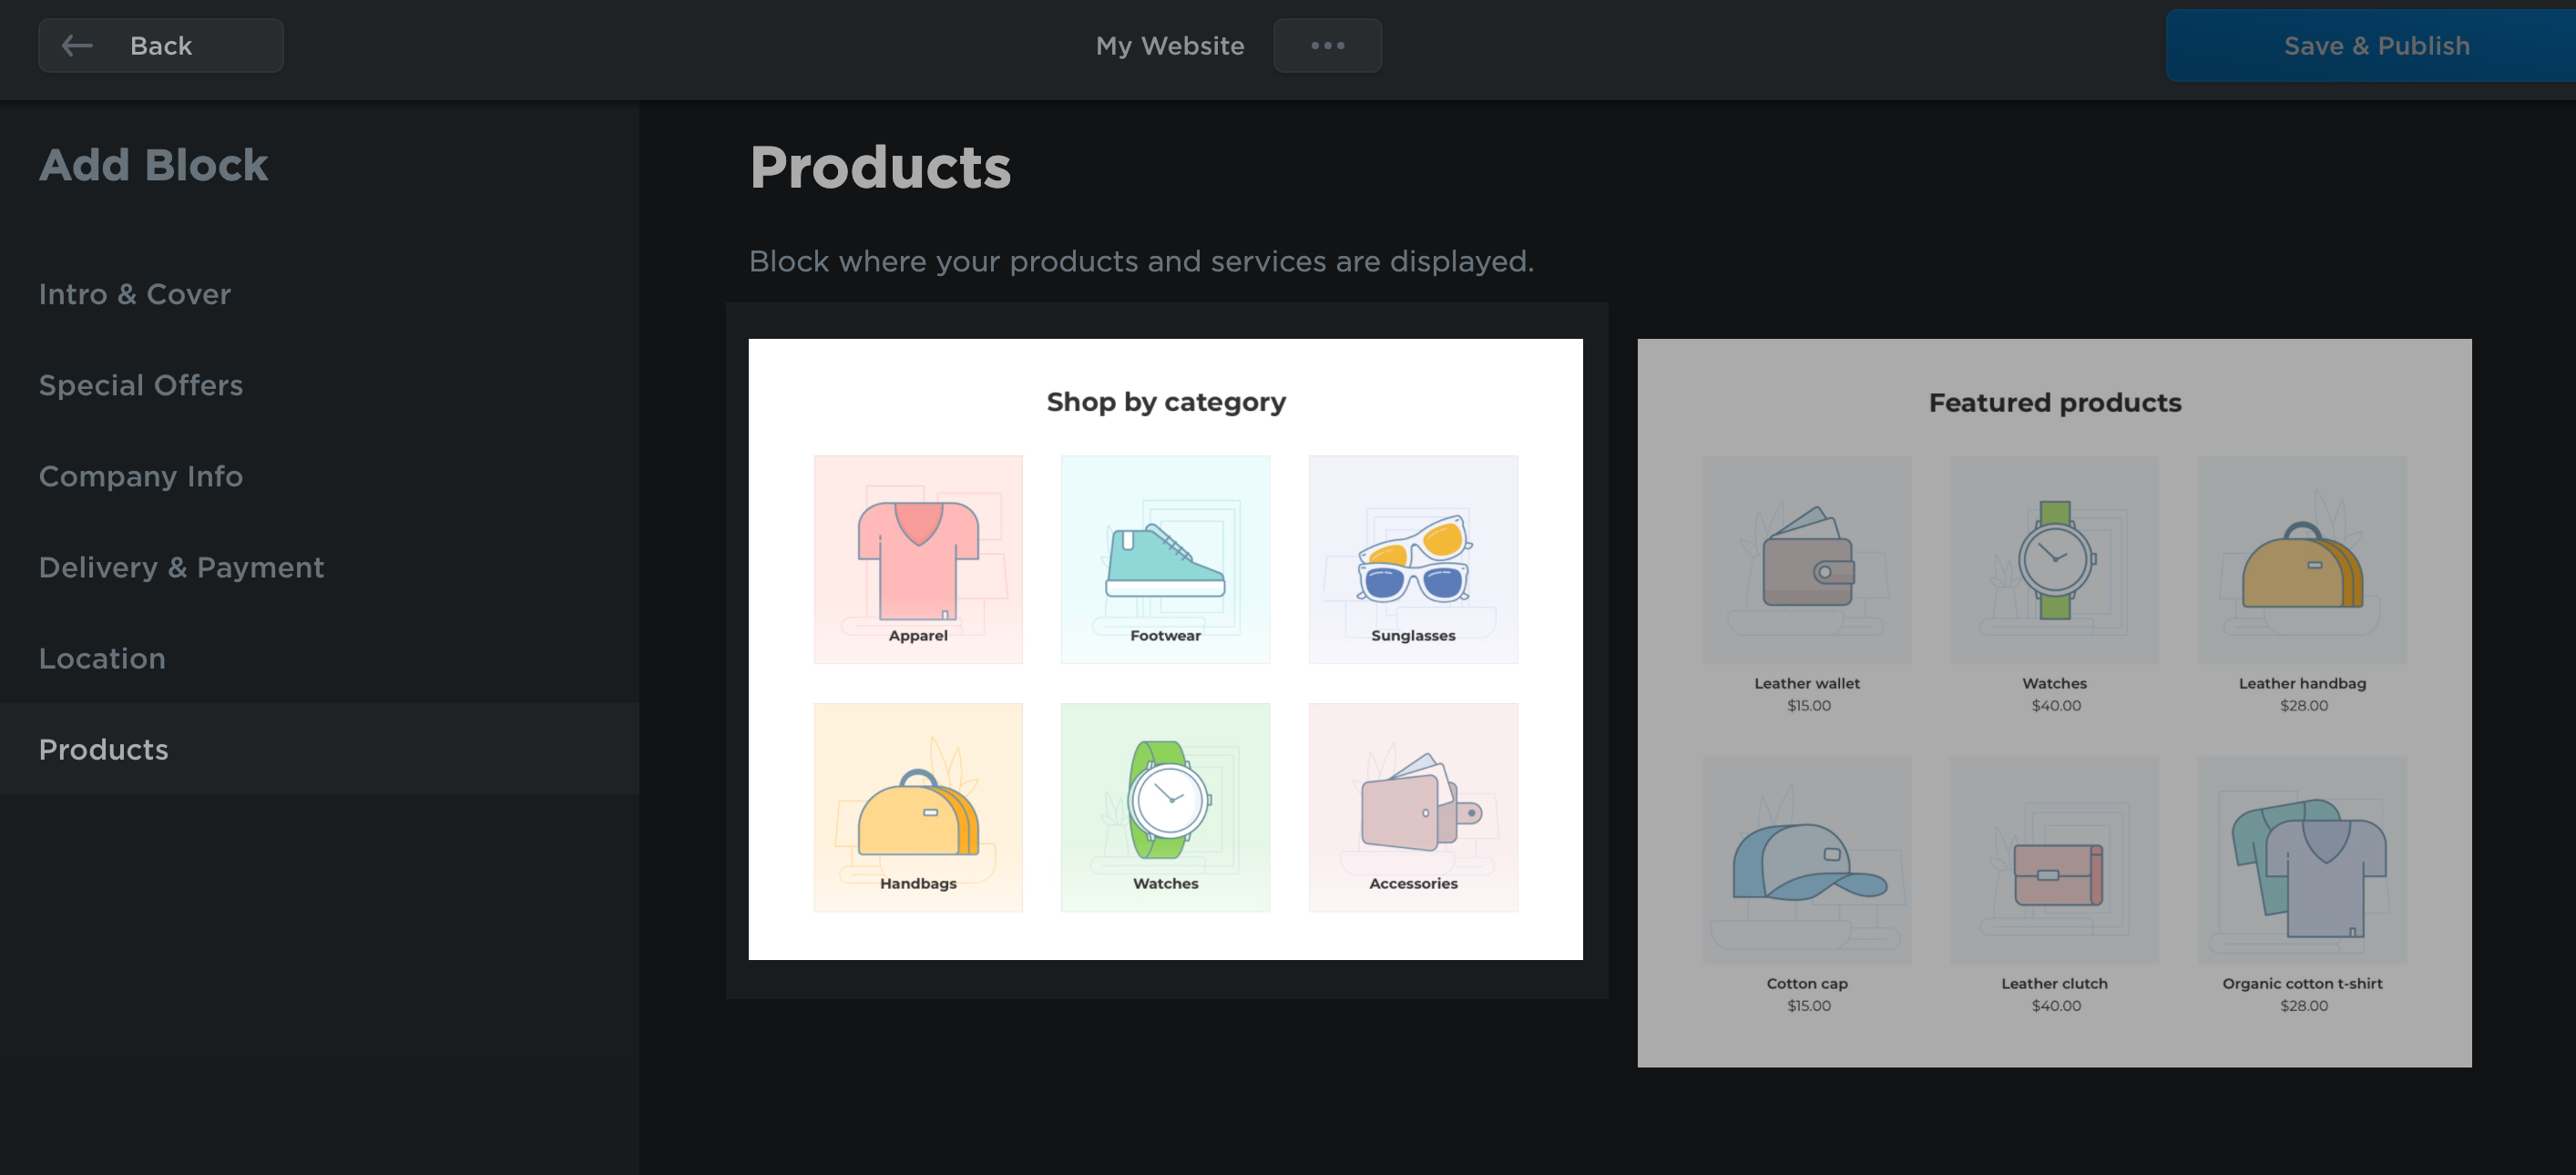
- Once you click on the block, it will be opened for editing and added to the Site Blocks list.
You can set up how both the Featured Products block and the Root Categories block look on the front page of your Instant Site. For that, go to the Design page in your store’s admin. You can also change the layout of these blocks (e.g., product name and price, how the “Buy Now” button and main product image are displayed, etc.) in the Site Editor.
To change layout of the store blocks in the Site Editor:
- From your store’s admin, go to Overview → Manage Instant Site → Edit Site (or Website → Edit Site).
- Click on the block.
- Make the necessary changes on the Content and Design tabs (set the block title, choose which elements to display, change fonts and the background style and color, etc.)
Settings in the Site Editor prevail over similar settings on the Design page in your store’s admin.
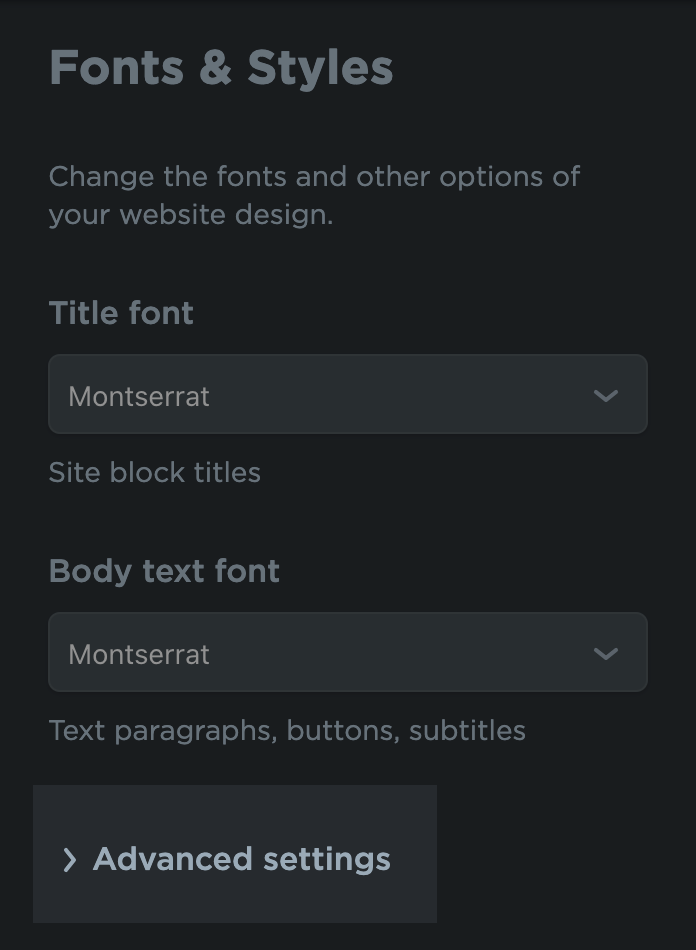
Applying default fonts and CSS
There are two major ways you can change the fonts on your Instant Site. First, you can set the fonts for every element of every block individually in the Design tab of this block. There you can choose font type, size and style (bold or italic) as well as the text color. Second, you can set the default font for all the blocks of your site with global font settings.
For example, you can use global settings if you are trying various layout options and you don’t need different fonts for different elements of your site blocks. This way, you will save yourself time and will have a consistent design across your website in a flash.
You can set:
- Title fonts (these are the fonts of the block headings)
- Body text fonts (these are the fonts of text paragraphs, button texts, and subtitles)
Once you have set the default font for your site, you can still change fonts for individual elements. Global font settings are applied only to those elements that have the “Default” font chosen in the Design tab of the Editor.
Global font settings that you apply in the Instant Site Editor are used only for the website itself, including store blocks (a preview that shows your customers where to access the store on your site). They are not used in your actual store where customers browse for products as the storefront is considered an independent part of your website.
In case you need to adjust the look (including fonts) of your store or you want to customize the look of your Instant Site – on top of the settings that are available in the Editor – you can do that by adding custom CSS codes. With the help of Cascading Style Sheets (CSS) you can change the styles that are used on your pages – adjust the color of buttons or hide them, adjust fonts, hide prices, and much more.
To apply fonts and/or styles:
- From your store’s admin, go to Overview → Manage Instant Site → Edit Site (or Website → Edit Site).
- Click Settings → Fonts & Styles.
- To set default fonts for your Instant Site, choose the fonts in the Title font and Body text font dropdowns.
- To apply styles, click Advanced settings and enter your CSS code:
In case you switched to the New-gen Instant Site from the old version of our Instant Site and have some active CSS themes previously applied in the Design page of your store’s admin, then these codes will still be applied in your store (until you deactivate them). In case you later apply new codes in the Instant Site Editor and there are some intersections, the codes that you apply in the Design page will have priority for your store pages.
Changing website address and store name
You can edit the name and address of your store website so that they reflect the concept and name of your brand.
To edit the name of your website:
- From your store’s admin, go to Settings → General → Store profile.
- Enter the store name into the Store name field in the Store name and web address section.
- Click Save.
To edit the address of your website:
- From your store’s admin, go to Overview → Manage Instant Site (or Website → Domain).
- Click the Change Address button.
- Enter the name you prefer for your web address into the Use our subdomain field.
- Click Save.
Showing the cookie consent banner
In countries like the EU, you might need to show the cookie consent banner on your store website. To display it, go to Settings → Tracking & Analytics in the Instant Site Editor (Overview → Manage Instant Site → Edit Site) and enable the Show cookie consent banner toggle:

This toggle enables the cookie consent banner both on your Instant Site and in your store. You can also enable the banner to show it on your store pages only (on the Settings → Legal page in your store admin).