Guide to product details
Products are the physical goods, digital files, and services that you sell. To create a product, you need to specify the name and upload product images. In addition, you can add product details that help your clients better understand the product: add description, available sizes, weight, etc. You don’t have to provide every detail for each product.

You can view and edit product details from the Catalog → Products page in your store admin.
To manage details for multiple products at a time, use our Bulk Product Editor.
Images
Images show customers what your products look like. Selling to consumers is all about presentation. You can show the various perspectives of the product, such as front, side, underneath, close-up, etc., so that customers see what they are buying in detail.
Remember, the quality of your product images directly affects your ability to generate sales. Here are some tips:
- Each product image should be of uniform size and style across all products you sell.
- Use high-quality images, so customers can see any fine details.
Learn how to add product images →
Name and description
Name is the title of your product. When you name a product, you can automatically make customers think about its most valuable components and what they can get when they buy this product from you.
Description is the information about your product. It emphasizes product advantages, lists its characteristics, or highlights product features. You may also use videos, images, and animated elements to help describe your product. Unique product descriptions rank higher in search engines.
The product description section has the built-in text editor, so you can easily add text (and change its color, size, and font), bullet points, paragraphs, links, or additional images and videos.
Tips to improve your product descriptions:
- Avoid long sentences and complex vocabulary: imagine you are explaining the product to a 10-year-old child.
- Include product demo videos: Just by watching a person hold, touch, and interact with the product while explaining its pros and cons is the next best thing to visiting a store.
- Provide a short and long version of your description: Some people scan rather than read, some like to read more in-depth about your product, make sure you cover both types.
SKU
SKU (short for “Stock Keeping Unit”) is the code that identifies the product within your business. You can use the product identification code provided by manufacturers or your own combinations of letters and numbers. Each SKU needs to be unique. If you leave the SKU field empty, we will automatically generate an SKU.
You can choose whether SKUs are displayed on the product details pages and on the category pages in your catalog (e.g., if you want customers to know SKUs). For that, go to Design → Sidebar → Product SKU and Design → Product Card details and layout → Product SKU respectively.
Want to sell the same product but in different sizes or colors from one page? You can add variations of the product with their own SKUs.
Weight
Weight is the product’s actual weight. You can leave this field empty (the weight will be set equal to 0) if you sell digital products or services or if you don’t ship this product. For calculating the correct automatic shipping rates, enter the exact product’s weight (with packaging).
If you want to display the entered weight values on product pages, you can choose this option on the Design page, in the Sidebar section (Product details block).
To display product weight without packaging, you can use product attributes.
Check the Requires shipping or pickup box under the Weight field if the product requires shipping. Uncheck this box, if you don’t ship the physical product:

Pricing
Pricing is what you’re charging for the product. You don’t need to factor in shipping/delivery costs in the price that you input, as they can be set separately.
There is an All prices include taxes or All prices do not include taxes text under the price that you enter if you have taxes that apply to this product in your store:
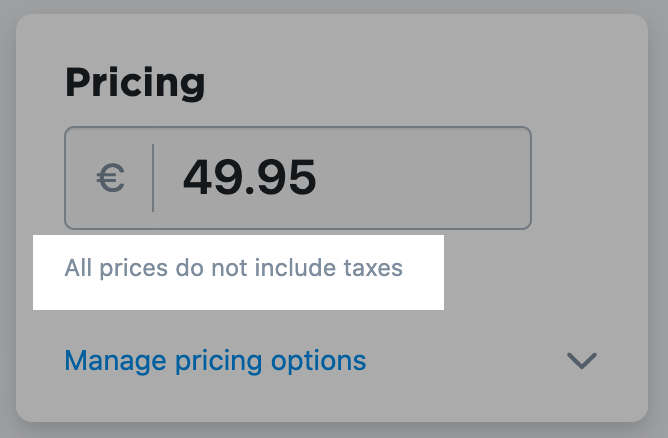
This text is displayed according to the option you choose in the Settings section on the Taxes page in your store admin. This way, you can enter prices with or without taxes.
If you sell differently taxed products or some of your products are tax-exempt, you can add product-specific tax rates and assign the rates to items in their Taxes tabs.
If you click the Manage pricing options link below the price, you can see the Compare to price, Bulk discount, and https://storeapp.io/help-center/article/pay-what-you-want-pricing/ settings:

“Compare to” price — The original price for a product that is on sale. When you enter a “Compare to” price, the product displays a sale price and savings.

Bulk discount — Tiered pricing for each product based on quantity. Discounts are applied immediately as soon as the quantity added to the cart changes. For example, a product costs $44, but if you buy five items, the price will be $40 each.

“Pay what you want” — A pricing option that allows customers to name their own prices for products in your store. If you enable it, there will be an empty field on the product page where your customers can enter the price that they are ready to pay. You can set the minimum possible price (e.g., $44) for your product and provide price suggestions if you want to.

Product availability and stock control
Availability — Product availability can be selectively enabled (and disabled) for each product. When disabled, your store visitors can’t see this product on your storefront. Enable whenever you are ready to sell.
Stock control — If you have a limited number of a product to sell, you can use the stock control section to specify the quantity that you can sell online and set up low stock notifications.
- Enter the number of items in stock into the Quantity in Stock field
- Enter the number of items left in stock at which you want to receive the Low Stock notice into the Send me a note when quantity in stock reaches field (by default, it is “0”)

If you don’t want to track the stock of this product in store, choose Unlimited in the Quantity in Stock field. This will mean that the product is always available for purchase in unlimited amounts (it is useful when selling e-goods, for example).
Learn more about managing inventory in your store and managing stock of products with options →
Categories
Categories are groups/collections of products that a product is included in. They help customers navigate your store faster and find the products they need.
A product must be assigned to at least one category. One product may belong to several categories. If you do not assign a product to any special category, it is automatically added to the default Store front page category. Disable the Feature on the store’s front page toggle if you don’t want to show this product on the front page of your store:

If you assign a product to any category on top of the Store front page category, this category is considered to be the product’s default store category. If the product is assigned to two or more categories, one of the categories will be marked as Default:

The default category will be shown in the breadcrumbs on your product’s page. In our example, if you assigned boardshorts to the “New Arrivals” and “Men’s Apparel” categories and selected the “New Arrivals” category as default, breadcrumbs for the item on the product page will look like this: Home / Store / New Arrivals.
To change the default category:
- From your store admin, go to Catalog → Products.
- Open the product you want to change the default category for.
- Scroll down to the Categories section.
- Choose the category you want to make default and click the three dots.
- Click Make default and click Save.
Learn more about product categories →
Product ribbons and product subtitles
Both product ribbons and product subtitles are a way to attract additional attention to a product on your storefront.
Product subtitles are short descriptions that you can provide for your products to give customers more information about product advantages or ingredients. You can choose to display subtitles on both the product list and on the product details page, or in one place only.
Learn more about product subtitles →
Product ribbons are colored labels that are displayed in your catalog above product images. They can help visually highlight certain products on your storefront. These tags contain your custom text; for example, “Bestseller”, “20% Off”, “New”, “Christmas deal” or “Free Shipping” — depending on your case.
Read more about product ribbons →
Attributes
The Attributes tab allows you to specify product identifiers, which you may need for accounting, inventory, or other purposes. For example, books are typically distinguished by such attributes as ISBN, author, publisher, cover type, language; apparel can be characterized by brand, season, material, etc. You can add this information in attributes.
With the help of attributes, you can also keep some private details that you don’t want to share with your customers (e.g., net cost).
Learn more about product types and attributes →
If you use unique identifiers such as UPC, EAN, and ISBN numbers, you can use the barcode scanner in your store mobile app for iOS or Android for managing your products. You can scan a UPC/EAN/ISBN code right on your product to find the same item in the catalog or add codes to any existing products.
If you are selling on marketplaces, you can also choose the Marketplace category for this specific product. This can be useful in case you have products from different categories.
To be able to set a marketplace category for specific products, you need to set up a general marketplace category for your whole catalog first.
Options and variations
The Options tab is where you can create options and variations for your product.
Options — If you sell products that come in different colors, sizes, etc., you can list them as one base product with options. With the help of product options, you can also offer extras (like gift wrapping), or ask buyers to upload a file for the ordered product/service.
Learn more about product options →
Variations — If your product has options, you can additionally create variations for it. Product variations are unique sets of options (e.g., size L, or a Yellow XL).
Variations can help you track the stock of individual product options as you can assign a unique SKU to each variation. You can also add images for specific variations so that customers have a better picture of what they are buying. Additionally, you can set individual weights, UPCs, and prices for your variations.
Learn more about product variations →
Digital files
The Files tab allows you to upload the file or files, so you can sell downloadable files such as e-books, videos, music, digital art, and any other digital stuff. We instantly and securely deliver them to buyers upon purchase.
If you want to sell a physical product or service that includes a file (instruction, manual, e-book, etc.) that buyers can download after the purchase, you can also attach such a file in the Files tab.
Shipping & Pickup
The Shipping & Pickup tab allows you to mark products as shippable, set product-specific shipping methods and specify products’ weight and dimensions.
This product requires shipping or pickup — The setting for whether a product needs to be shipped. Uncheck it for digital products and services or for products that you never ship.
If you switch the This product requires shipping or pickup toggle, the same changes will be applied in the Requires shipping or pickup box on the General tab.
Weight and Dimensions — The product’s actual weight and dimensions.
The value in the Weight field mirrors the value in the Weight field on the General tab of the product details page. In the Shipping & Pickup tab, you can also specify your products’ Length, Width, and Height to obtain precise carrier-calculated shipping rates for your customers (if the integration with your shipping carrier supports dimensional weight).
Shipping Rates — Individual shipping rates for this particular product (if it requires shipping). Use one of four offered options to set product-specific shipping rates:

By default, your store’s shipping methods that you set on the Shipping and Pickup page are used. You can keep the first shipping rates option — your store’s regular shipping rates — if the item is shipped like most of the products in your store.
Or you can set special shipping rates for the product — add a fee above your regular store’s rates, choose individual shipping methods for this product, specify individual shipping price per each item ordered or offer free shipping for this product.
Taxes
If you’re using manual taxes in your store and your product requires product-specific tax rates (e.g., it has a special tax applied to it, or it is tax exempt), you can enable or disable specific taxes on the Taxes tab.

If this product is taxed like any other product in your store or you’re using automatic taxes, you don’t need to set anything on the Taxes tab.
SEO
On the SEO tab, you can set specific SEO-related information for your product’s page. When analyzing a webpage, search engines get information about its content from the so-called “meta tags”. This includes the page title and meta description. Search engines use meta tags to describe pages as they appear in the search results and rank them by relevance.
We automatically generate metadata based on your product’s name and its description. Search engines display a limited number of characters, so you may want to rewrite the page title and meta description. Edit page title and descriptions with relevant keywords, so your product appears higher in search engine results.
Page title — The title is shown as a clickable link in search results. You can customize the title to target your clients’ interests more accurately.
Meta description — A short sentence summarizing the content of the product. Write a more detailed text describing your product offer. Meta descriptions can be any length, but Google generally truncates snippets to ~155–160 characters.
Learn more about SEO in your store →
Related products
The Related Products tab allows you to display the “You may also like” section in your online store as well as to cross-sell products in the cart. You can manually select specific recommended products, show random products, or use a combination of these two options.
Learn how to set up related products →
“Buy Now” Button
On the “Buy Now” Button tab, you can generate a product’s individual integration code to add this specific product to an external website or blog. You can go for this option if you don’t want to add a whole store — for example, you sell only a few items, or you want to create a landing page for a product, or you need to supplement a blog post with the option to buy the product, etc.
Learn more about creating and adding Buy Button →
FAQ
How do I add a video to a product description?
To add a video to a product description:
- Upload your video file to YouTube or Vimeo.
- Copy the link (address from the browser) of the uploaded video.
- From your store admin, go to Catalog → Products.
- Create a new product or choose an existing one.
- Paste the link into the Description field.
- Save the changes. The video will appear in your product description.
How can I remove decimals from product prices?
To remove decimals from product prices:
- From your store admin, go to Settings → General → Regional Settings.
- Enable Hide trailing zeros in fractional part:

This removes all remainders from your prices if they show a zero — $40.00 will show as $40. If a product price or an order total has a decimal that is not zero (e.g. $40.95), We will show the decimal to reflect the exact cost for customers.
Note that the fractional part is removed automatically if your currency doesn’t use decimals. For example, prices will never include decimals if the currency is set to the Japanese Yen.
How do I know when my products are low or out of stock?
We can send you a message about the low stock of a product if you enable stock tracking for this product. Learn more about setting up inventory tracking for a product →
Notifications are not sent for products listed with Unlimited quantity.
Can I set the weight for ounces?
Yes. To enter product weight in ounces, go to Settings → General → Regional Settings → Weight & Size and choose oz in the Weight unit field:

If your product weights are in ounces but you need to display them in pounds (e.g., for your shipping carrier), you can always set your weight unit to pounds on the Weight & Size page and convert the weights in ounces to a decimal ratio for pounds. Each ounce is 0.0625 pounds. Make sure to use a zero before the decimal.